<?xml version="1.0" encoding="utf-8"?><feed xmlns="http://www.w3.org/2005/Atom" ><generator uri="https://jekyllrb.com/" version="4.4.1">Jekyll</generator><link href="/feed.xml" rel="self" type="application/atom+xml" /><link href="/" rel="alternate" type="text/html" /><updated>2026-04-14T23:13:55+00:00</updated><id>/feed.xml</id><title type="html">Hello, I’m Drew and welcome to my blog!</title><subtitle>Welcome to my blog! I'm Drew, a cloud advocate and this is my blog.  I write about things I've learned, things I'm working on, and just about anything else that comes to mind.  I hope you enjoy it!
</subtitle><author><name>Drew Davis</name><email>myblog@davisdre.com</email></author><entry><title type="html">Identifying High Memory Usage with Htop in WSL</title><link href="/2024/03/09/identifying-high-memory-usage-with-htop-in-wsl.html" rel="alternate" type="text/html" title="Identifying High Memory Usage with Htop in WSL" /><published>2024-03-09T00:00:00+00:00</published><updated>2024-03-09T00:00:00+00:00</updated><id>/2024/03/09/identifying-high-memory-usage-with-htop-in-wsl</id><content type="html" xml:base="/2024/03/09/identifying-high-memory-usage-with-htop-in-wsl.html"><![CDATA[<h1 id="identifying-high-memory-usage-with-htop-in-wsl"><strong>Identifying High Memory Usage with Htop in WSL</strong></h1>

<p>If you’re running a Linux environment within Windows using WSL, monitoring system resources becomes essential. <strong>Htop</strong>, a powerful command-line utility, allows you to visualize resource usage, including memory, CPU, and more.</p>

<h2 id="step-1-install-htop"><strong>Step 1: Install Htop</strong></h2>

<p>First, ensure that <strong>Htop</strong> is installed. Open your Windows terminal and run:</p>

<div class="language-bash highlighter-rouge"><div class="highlight"><pre class="highlight"><code><span class="nb">sudo </span>apt-get update
<span class="nb">sudo </span>apt-get <span class="nb">install </span>htop
</code></pre></div></div>

<h2 id="step-2-launch-htop"><strong>Step 2: Launch Htop</strong></h2>

<p>Simply type <code class="language-plaintext highlighter-rouge">htop</code> in your terminal and hit Enter. You’ll see a real-time overview of system processes.</p>

<h2 id="step-3-sort-by-memory-usage"><strong>Step 3: Sort by Memory Usage</strong></h2>

<p>By default, Htop sorts processes by CPU usage. To focus on memory, press <code class="language-plaintext highlighter-rouge">F6</code> (or <code class="language-plaintext highlighter-rouge">Ctrl + F6</code>). Select <code class="language-plaintext highlighter-rouge">MEM%</code> to sort by memory consumption.</p>

<h2 id="step-4-identify-the-culprit"><strong>Step 4: Identify the Culprit</strong></h2>

<p>Scroll through the list. If you notice an application consuming excessive memory, it’s likely the culprit. In my case, it’s <strong>‘Ollama serve’</strong>.</p>

<h2 id="step-5-investigate-further"><strong>Step 5: Investigate Further</strong></h2>

<p>Select the process (use arrow keys) and press <code class="language-plaintext highlighter-rouge">F1</code> for help. You’ll find detailed information about the selected process, including its PID, memory usage, and more.</p>

<h2 id="step-6-take-action"><strong>Step 6: Take Action</strong></h2>

<p>Depending on your needs, you can:</p>
<ul>
  <li><strong>Terminate</strong> the process by pressing <code class="language-plaintext highlighter-rouge">F9</code>.</li>
  <li><strong>Investigate</strong> further using other tools or logs.</li>
  <li><strong>Optimize</strong> the application to reduce memory usage.</li>
</ul>

<p>Remember, Htop provides real-time insights, so keep an eye on it periodically to maintain a healthy system.</p>

<hr />

<p>In summary, Htop is your go-to tool for identifying memory-hungry processes in your WSL environment. Keep your system lean and efficient by monitoring resource usage effectively! 🚀🔍</p>

<p>I hope you enjoyed reading this blog post and learned something new from it. If you did, please consider supporting me and my work by buying me a coffee via <a href="https://www.buymeacoffee.com/davisdredotcom">buymeacoffee.com</a>. It’s a simple and easy way to show your appreciation and help me keep creating more content like this. Thank you for your time and attention. Have a great day!</p>

<p><a href="https://www.buymeacoffee.com/davisdredotcom" target="_blank"><img src="https://cdn.buymeacoffee.com/buttons/v2/default-yellow.png" alt="Buy Me A Coffee" style="height: 60px !important;width: 217px !important; margin:auto; display:block;" /></a></p>]]></content><author><name>Drew Davis</name><email>myblog@davisdre.com</email></author><summary type="html"><![CDATA[Identifying High Memory Usage with Htop in WSL]]></summary></entry><entry><title type="html">Optimizing File Organization for Plex on Synology NAS</title><link href="/2024/03/09/optimizing-file-organization-for-plex-on-synology-nas.html" rel="alternate" type="text/html" title="Optimizing File Organization for Plex on Synology NAS" /><published>2024-03-09T00:00:00+00:00</published><updated>2024-03-09T00:00:00+00:00</updated><id>/2024/03/09/optimizing-file-organization-for-plex-on-synology-nas</id><content type="html" xml:base="/2024/03/09/optimizing-file-organization-for-plex-on-synology-nas.html"><![CDATA[<p>🚀 Optimizing File Organization for Plex on Synology NAS</p>

<p>As a tech enthusiast and Plex aficionado, I recently embarked on a mission to streamline my media library. My trusty Synology NAS DS 220+ was the backbone of this endeavor, and PowerShell came to the rescue!</p>

<p>Here’s a snippet of the PowerShell script I used to whip my files into shape, adhering to Plex’s best practices for naming and organization:</p>
<pre><code class="language-PowerShell"># Specify the folder path where your files are located
# Example: $folderPath = 'C:\path\to\your\folder'
$folderPath = 'C:\path\to\your\folder'

# Get all files in the folder
$files = Get-ChildItem -Path $folderPath

foreach ($file in $files) {
    $newName = $file.Name
    
    # Remove unwanted wording
    $newName = $newName -replace '-1ndd', ''
    
    # Add a space before and after the dash
    $newName = $newName -replace '-', ' - '
    
    # Replace underscores with spaces
    $newName = $newName -replace '_', ' '

    # Construct the new file path
    $newPath = Join-Path -Path $folderPath -ChildPath $newName

    # Rename the file
    Rename-Item -Path $file.FullName -NewName $newName

    Write-Host "Renamed '$($file.Name)' to '$newName'"
}

# Cheers to a well-organized Plex library! 🎉
</code></pre>

<p>Remember, a tidy media library not only pleases the eye but also ensures smoother streaming experiences. Let’s keep our digital lives clutter-free! 📺🎶</p>

<p>Feel free to customize it further to reflect your personal journey and insights. Happy organizing! 🌟</p>

<p>I hope you enjoyed reading this blog post and learned something new from it. If you did, please consider supporting me and my work by buying me a coffee via <a href="https://www.buymeacoffee.com/davisdredotcom">buymeacoffee.com</a>. It’s a simple and easy way to show your appreciation and help me keep creating more content like this. Thank you for your time and attention. Have a great day!</p>

<p><a href="https://www.buymeacoffee.com/davisdredotcom" target="_blank"><img src="https://cdn.buymeacoffee.com/buttons/v2/default-yellow.png" alt="Buy Me A Coffee" style="height: 60px !important;width: 217px !important; margin:auto; display:block;" /></a></p>]]></content><author><name>Drew Davis</name><email>myblog@davisdre.com</email></author><summary type="html"><![CDATA[🚀 Optimizing File Organization for Plex on Synology NAS]]></summary></entry><entry><title type="html">How to Remove and Install a Linux Distribution on Windows Using WSL Commands</title><link href="/2024/01/14/wsl.html" rel="alternate" type="text/html" title="How to Remove and Install a Linux Distribution on Windows Using WSL Commands" /><published>2024-01-14T00:00:00+00:00</published><updated>2024-01-14T00:00:00+00:00</updated><id>/2024/01/14/wsl</id><content type="html" xml:base="/2024/01/14/wsl.html"><![CDATA[<h1 id="how-to-remove-and-install-a-linux-distribution-on-windows-using-wsl-commands">How to Remove and Install a Linux Distribution on Windows Using WSL Commands</h1>

<p>Windows Subsystem for Linux (WSL) is a feature that allows you to run Linux applications natively on Windows 10 and Windows 11. WSL supports multiple Linux distributions, such as Ubuntu, Debian, Fedora, and more. You can install and manage these distributions using WSL commands in PowerShell or Windows Command Prompt.</p>

<p>In this blog post, I will show you how I used WSL commands to remove a Linux distribution that was having issues and then install a new and updated distribution. This process is useful if you want to switch to a different Linux distribution or upgrade to a newer version.</p>

<h2 id="removing-a-linux-distribution-using-wsl-commands">Removing a Linux Distribution Using WSL Commands</h2>

<p>The first step is to remove the Linux distribution that you want to uninstall from WSL. To do this, you need to use the <code class="language-plaintext highlighter-rouge">wsl --unregister</code> command, which will delete the distribution and its files from your system. For example, if you want to remove Ubuntu, you can run the following command:</p>

<div class="language-powershell highlighter-rouge"><div class="highlight"><pre class="highlight"><code><span class="n">wsl</span><span class="w"> </span><span class="nt">--unregister</span><span class="w"> </span><span class="nx">ubuntu</span><span class="w">
</span></code></pre></div></div>

<p>You can also use the <code class="language-plaintext highlighter-rouge">wsl --list</code> command to see all the installed Linux distributions and their names. For example, the output of this command might look something like this:</p>

<div class="language-powershell highlighter-rouge"><div class="highlight"><pre class="highlight"><code><span class="n">Windows</span><span class="w"> </span><span class="nx">Subsystem</span><span class="w"> </span><span class="nx">for</span><span class="w"> </span><span class="nx">Linux</span><span class="w"> </span><span class="nx">Distributions:</span><span class="w">
</span><span class="n">Ubuntu</span><span class="w"> </span><span class="p">(</span><span class="n">Default</span><span class="p">)</span><span class="w">
</span><span class="n">Debian</span><span class="w">
</span></code></pre></div></div>

<h2 id="installing-a-linux-distribution-using-wsl-commands">Installing a Linux Distribution Using WSL Commands</h2>

<p>The next step is to install a new Linux distribution using WSL commands. To do this, you need to use the <code class="language-plaintext highlighter-rouge">wsl --install</code> command, which will download and install the Linux distribution of your choice from the online store. You can also specify the name of the distribution you want to install. For example, if you want to install Ubuntu 22.04, you can run the following command:</p>

<div class="language-powershell highlighter-rouge"><div class="highlight"><pre class="highlight"><code><span class="n">wsl</span><span class="w"> </span><span class="nt">--install</span><span class="w"> </span><span class="nx">Ubuntu-22.04</span><span class="w">
</span></code></pre></div></div>

<p>You can also use the <code class="language-plaintext highlighter-rouge">wsl --list --online</code> command to see the list of available Linux distributions that you can install from the online store. For example, the output of this command might look something like this:</p>

<div class="language-powershell highlighter-rouge"><div class="highlight"><pre class="highlight"><code><span class="n">Windows</span><span class="w"> </span><span class="nx">Subsystem</span><span class="w"> </span><span class="nx">for</span><span class="w"> </span><span class="nx">Linux</span><span class="w"> </span><span class="nx">Distributions:</span><span class="w">
</span><span class="n">Ubuntu-22.04</span><span class="w">
</span><span class="nx">Ubuntu-20.04</span><span class="w">
</span><span class="n">Debian</span><span class="w">
</span><span class="nx">Fedora</span><span class="w">
</span><span class="n">openSUSE</span><span class="w">
</span></code></pre></div></div>

<h2 id="setting-the-default-linux-distribution-and-version-using-wsl-commands">Setting the Default Linux Distribution and Version Using WSL Commands</h2>

<p>After installing a new Linux distribution, you might want to set it as the default one that will launch when you run the <code class="language-plaintext highlighter-rouge">wsl</code> command. To do this, you need to use the <code class="language-plaintext highlighter-rouge">wsl --set-default</code> command, which will set the default Linux distribution for WSL. For example, if you want to set Ubuntu 22.04 as the default distribution, you can run the following command:</p>

<div class="language-powershell highlighter-rouge"><div class="highlight"><pre class="highlight"><code><span class="n">wsl</span><span class="w"> </span><span class="nt">--set-default</span><span class="w"> </span><span class="nx">Ubuntu-22.04</span><span class="w">
</span></code></pre></div></div>

<p>You might also want to set the version of WSL that your Linux distribution will run on. WSL has two versions: WSL 1 and WSL 2. WSL 2 is the latest and recommended version, as it offers better performance, compatibility, and features. To set the version of WSL for your Linux distribution, you need to use the <code class="language-plaintext highlighter-rouge">wsl --set-version</code> command, which will convert the distribution to the specified version of WSL. For example, if you want to set Ubuntu 22.04 to run on WSL 2, you can run the following command:</p>

<div class="language-powershell highlighter-rouge"><div class="highlight"><pre class="highlight"><code><span class="n">wsl</span><span class="w"> </span><span class="nt">--set-version</span><span class="w"> </span><span class="nx">Ubuntu-22.04</span><span class="w"> </span><span class="nx">2</span><span class="w">
</span></code></pre></div></div>

<p>You can also use the <code class="language-plaintext highlighter-rouge">wsl --list --verbose</code> command to see the list of installed Linux distributions and their versions. For example, the output of this command might look something like this:</p>

<div class="language-powershell highlighter-rouge"><div class="highlight"><pre class="highlight"><code><span class="n">Windows</span><span class="w"> </span><span class="nx">Subsystem</span><span class="w"> </span><span class="nx">for</span><span class="w"> </span><span class="nx">Linux</span><span class="w"> </span><span class="nx">Distributions:</span><span class="w">
</span><span class="n">Ubuntu-22.04</span><span class="w"> </span><span class="p">(</span><span class="n">Default</span><span class="p">)</span><span class="w"> </span><span class="p">(</span><span class="n">Running</span><span class="p">)</span><span class="w"> </span><span class="nx">Version</span><span class="w"> </span><span class="nx">2</span><span class="w">
</span><span class="n">Debian</span><span class="w"> </span><span class="p">(</span><span class="n">Stopped</span><span class="p">)</span><span class="w"> </span><span class="nx">Version</span><span class="w"> </span><span class="nx">1</span><span class="w">
</span></code></pre></div></div>

<h2 id="conclusion">Conclusion</h2>

<p>In this blog post, I showed you how I used WSL commands to remove and install a Linux distribution on Windows. This process is simple and convenient, as you can manage your Linux distributions using WSL commands in PowerShell or Windows Command Prompt. You can also switch between different Linux distributions and versions of WSL as you wish.</p>

<p>I hope you found this blog post helpful and learned something new. If you have any questions or feedback, please leave a comment below. Thank you for reading!</p>]]></content><author><name>Drew Davis</name><email>myblog@davisdre.com</email></author><summary type="html"><![CDATA[How to Remove and Install a Linux Distribution on Windows Using WSL Commands]]></summary></entry><entry><title type="html">Insights and Takeaways from the 2023 Indiana Public Sector Cybersecurity Summit</title><link href="/2023/12/05/Attended_the_2023_indiana_public_sector_cybersecurity_summit.html" rel="alternate" type="text/html" title="Insights and Takeaways from the 2023 Indiana Public Sector Cybersecurity Summit" /><published>2023-12-05T00:00:00+00:00</published><updated>2023-12-05T00:00:00+00:00</updated><id>/2023/12/05/Attended_the_2023_indiana_public_sector_cybersecurity_summit</id><content type="html" xml:base="/2023/12/05/Attended_the_2023_indiana_public_sector_cybersecurity_summit.html"><![CDATA[<h1 id="overview">Overview</h1>

<p>Attending the 2023 Indiana Public Sector Cybersecurity Summit was a valuable experience that provided a comprehensive overview of the latest developments and strategies in defending against cyber threats. Hosted by the Indiana Office of Technology, the summit brought together government technology professionals and cybersecurity leaders from across the state to share insights, experiences, and best practices.</p>

<h1 id="keynote-address---keep-your-head-out-of-the-cyber-sand">Keynote Address - “Keep Your Head Out of the Cyber Sand”</h1>

<p>
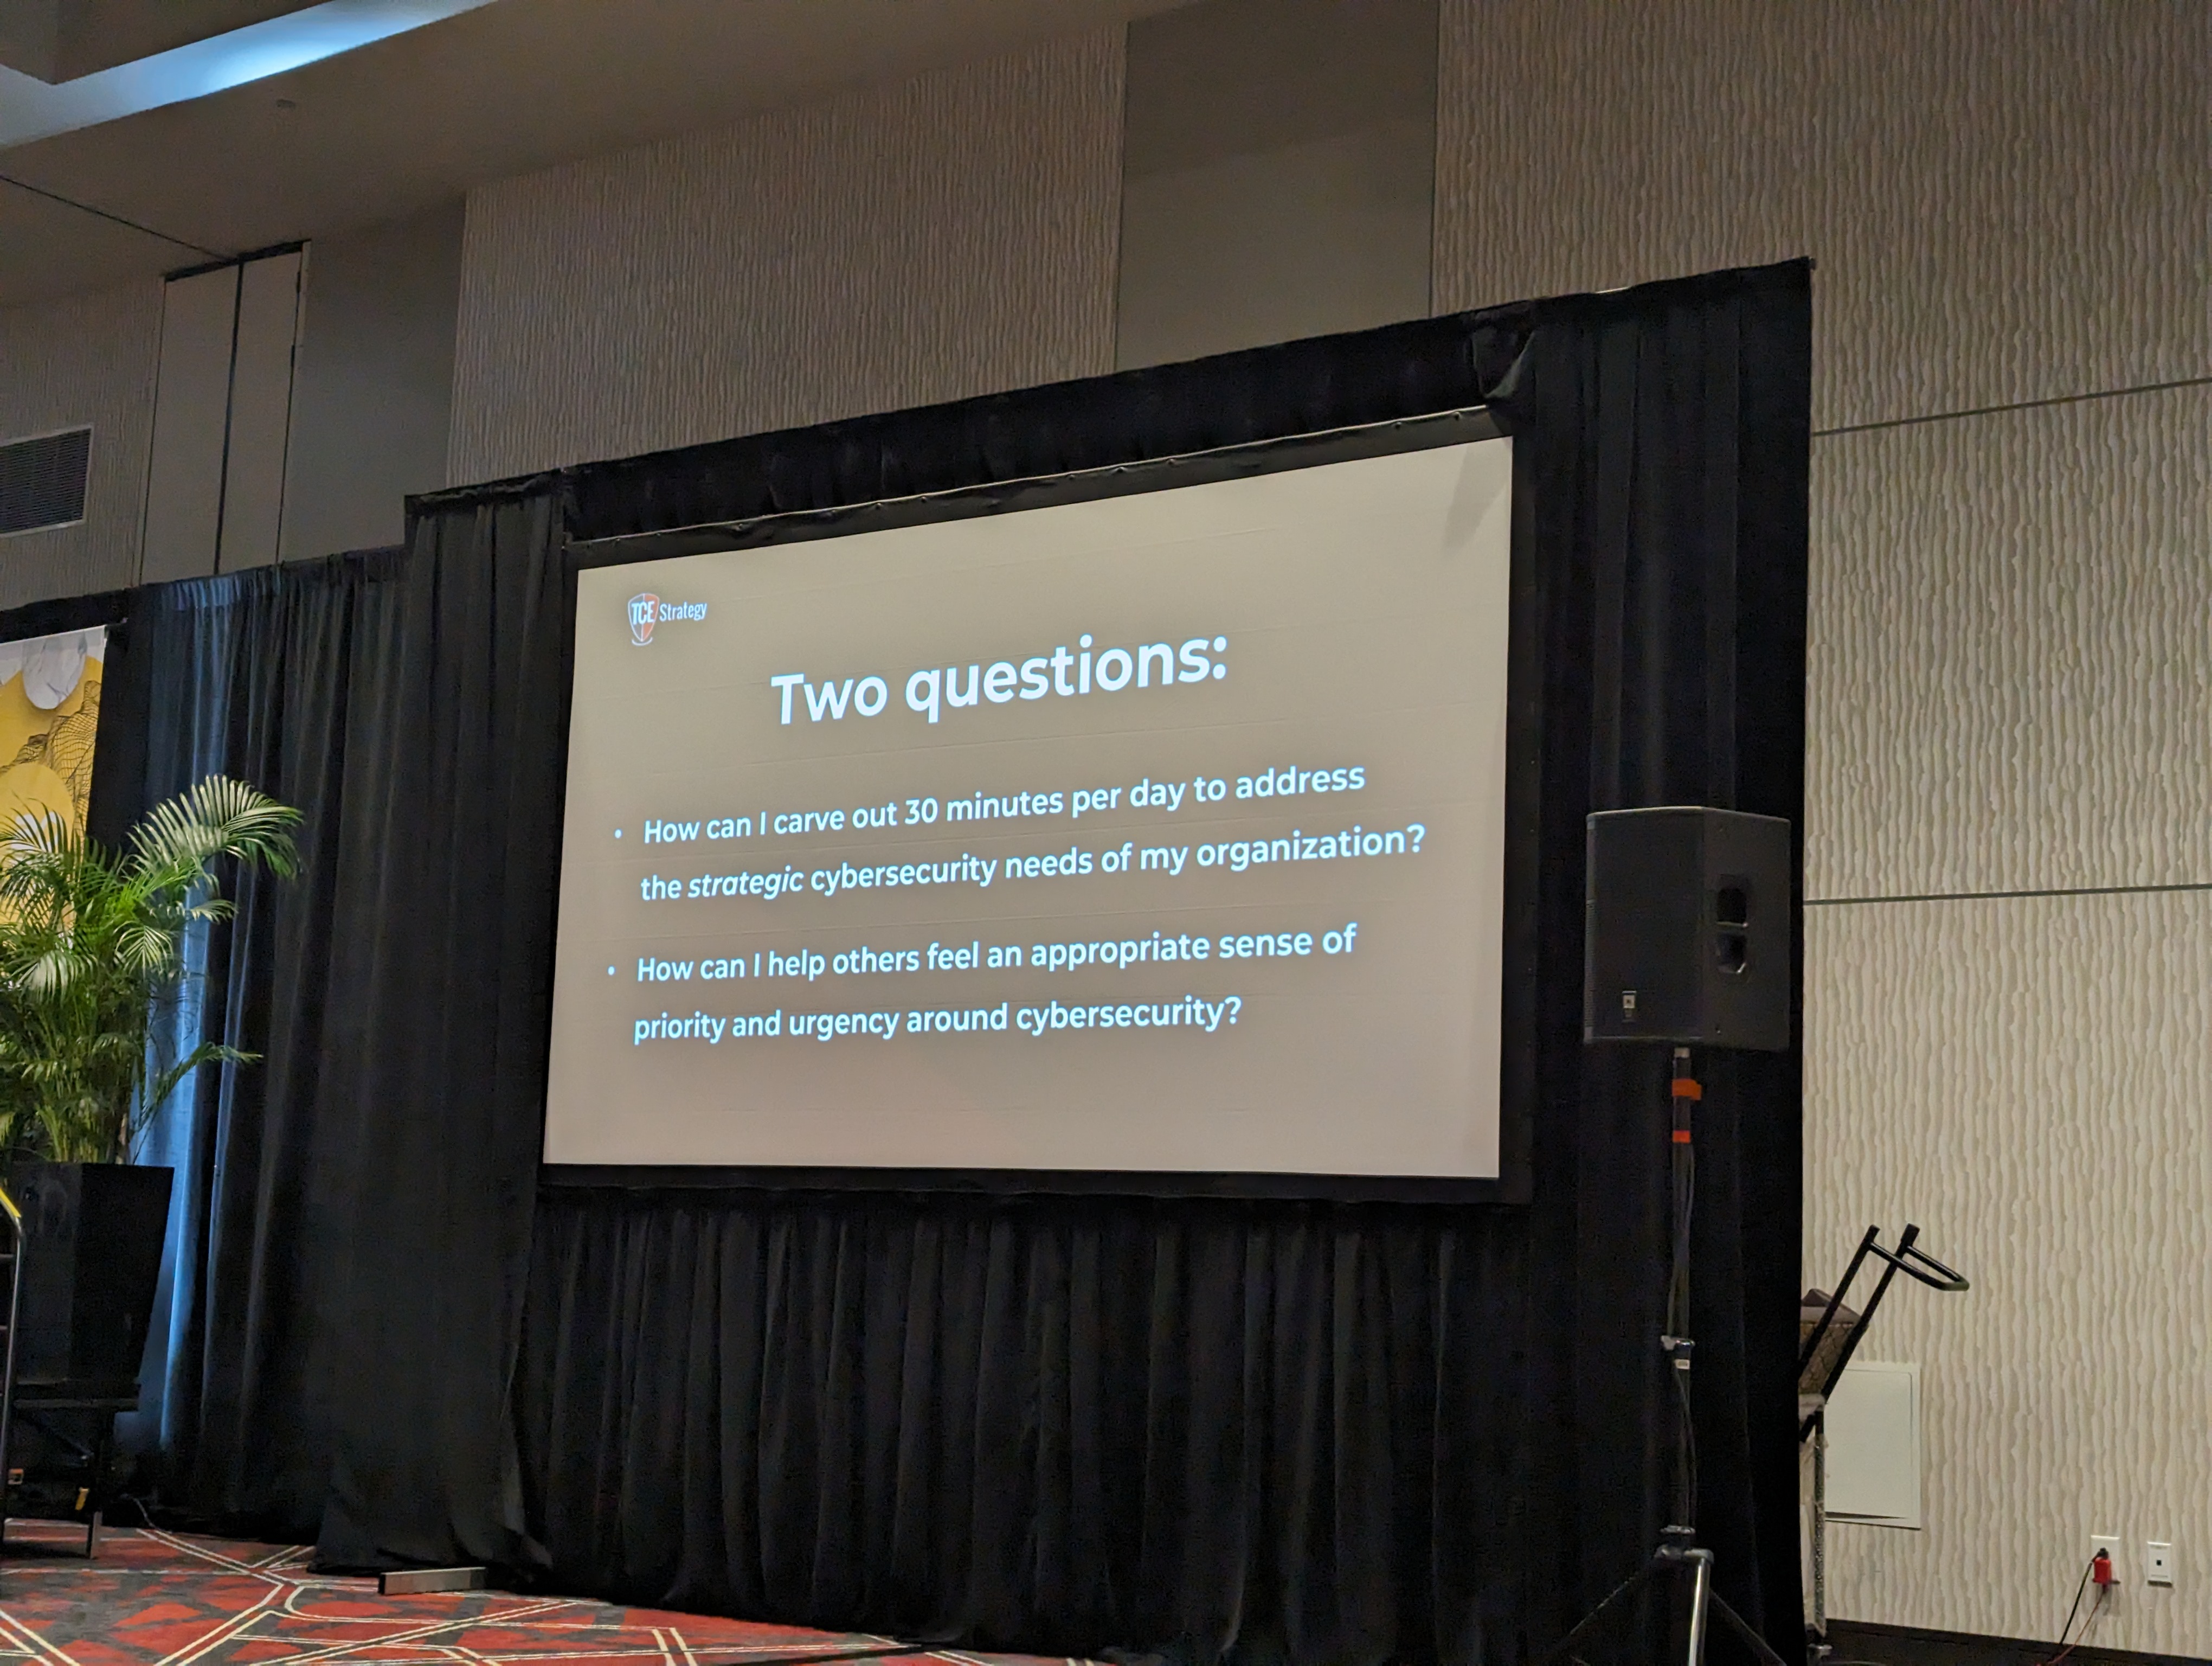
Bryce Austin, CEO of TCE Strategy, delivered a captivating keynote highlighting the power of processes and procedures over relying solely on tools. Drawing inspiration from the USS Missouri battleship, he illustrated the importance of distinguishing between “Black Phones” for internal communication and “Red Phones” for external connections, emphasizing their critical roles. Expressing concern, he stated, “We have a problem with security, and we are not taking it seriously,” urging a shift in mindset. Recommending his book, “Secure Enough?: 20 Questions on Cybersecurity for Business Owners and Executives”. Rigorous response strategies were encouraged, using the analogy of a squirrel versus a porcupine for a robust security posture. Additionally, Austin shed light on the limitations of geo-location as not being fully security-proof. His engaging keynote left attendees with valuable insights and a call to take security seriously in both personal and professional contexts.
<img src="/assets/2023-12-15/keynote.jpg" alt="" /></p>

<h1 id="ai--ml-in-cyber-defense-panel">AI + ML in Cyber Defense Panel</h1>

<p>
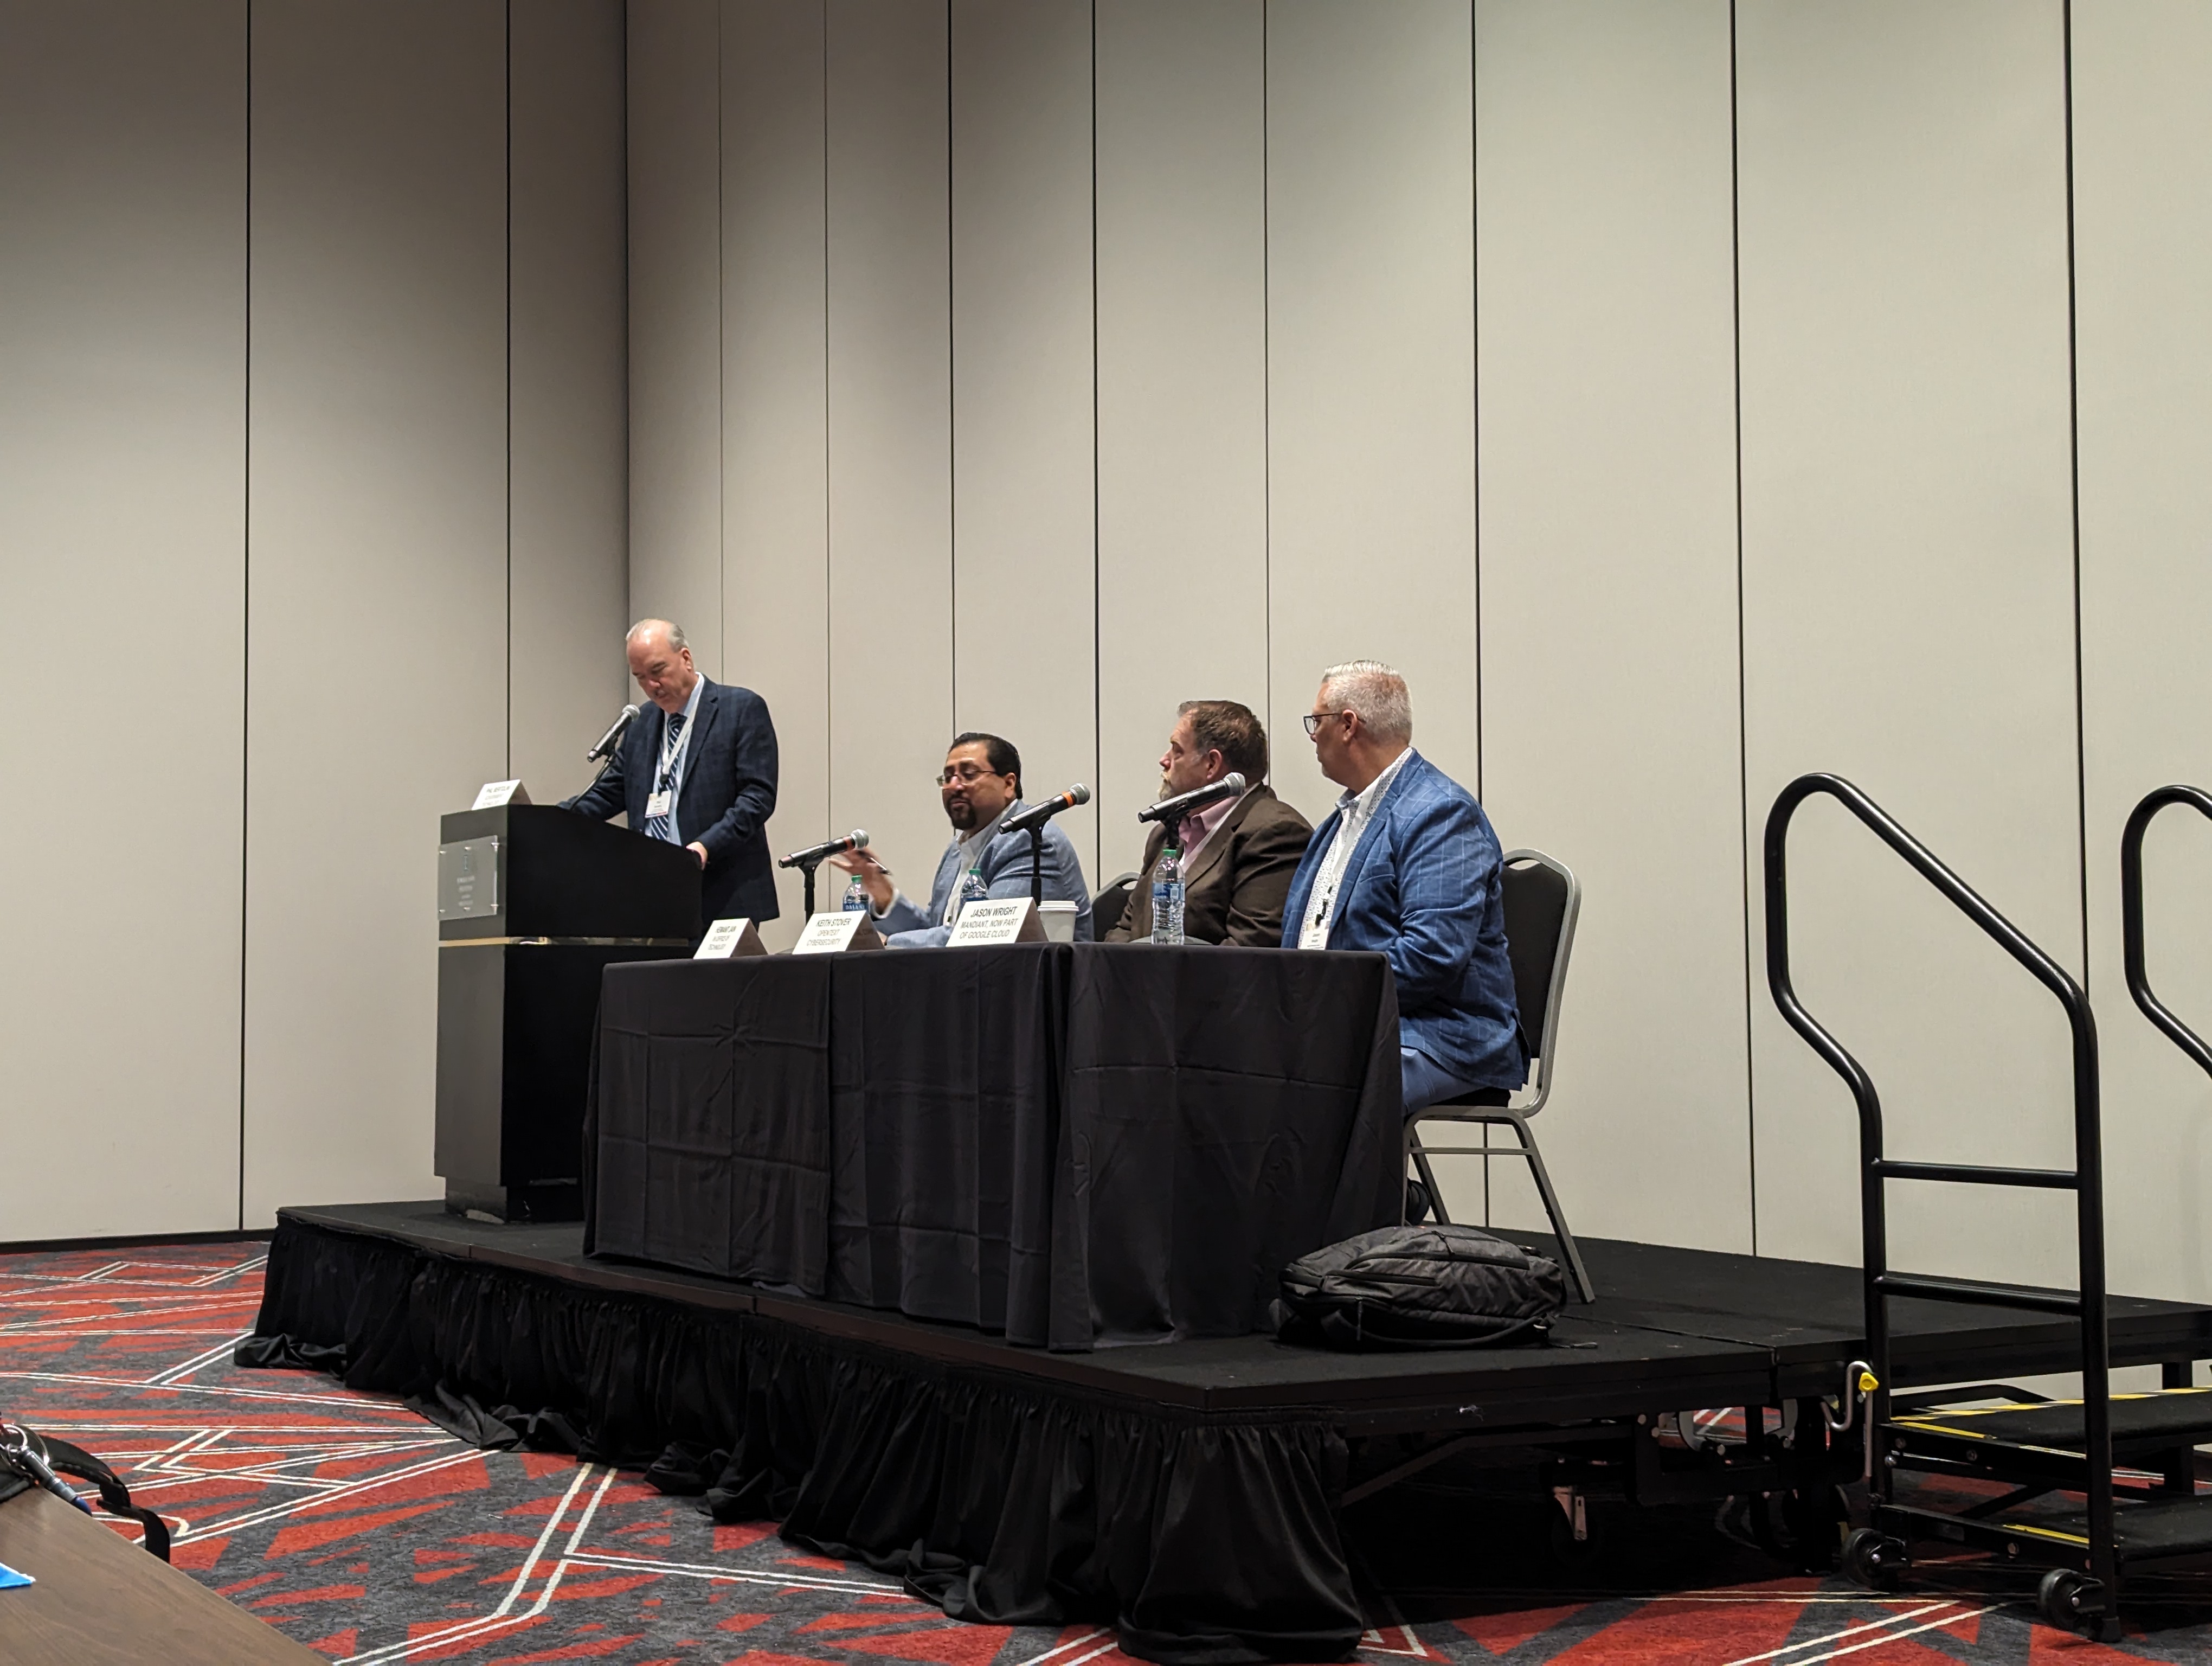
Moderated by Phil Bertolini (Senior Vice President, Government Technology), the panel on maximizing the role of AI and ML in cyber defense featured insights from Hemant Jain (Chief Information Security Officer, Office of Technology, State of Indiana), Keith Stover (Senior Solutions Architect, SecOps, OpenText Cybersecurity), and Jason Wright (SLED Practice Lead, Mandiant, now part of Google Cloud). The discussion emphasized the need to verify data when utilizing Generative AI (Gen AI) and the importance of embracing AI and ML without fear. The difficulty in identifying bad actors using Gen AI was acknowledged, with an interesting observation on the improved grammar in phishing emails.
<img src="/assets/2023-12-15/session_ai_ml.jpg" alt="" /></p>

<h1 id="featured-speakers---cyber-resources-at-the-ready-cisa--ms-isac-are-here-to-help">Featured Speakers - “Cyber Resources at the Ready: CISA + MS-ISAC Are Here to Help”</h1>

<p>Moderated by Phil Bertolini (Senior Vice President, Government Technology), this panel featuring Bridget Bean (Assistant Director for the Integrated Operations Division, Cybersecurity and Infrastructure Security Agency (CISA)) and Heather Doxon (Regional Engagement Manager, Multi-State Information Sharing and Analysis Center (MS-ISAC)) highlighted the underutilization of resources provided by CISA and MS-ISAC in the public sector. The synergy between these two groups, when combined with organizational teams, was emphasized as a powerful approach to enhancing security coverage and staying ahead of emerging threats. The importance of treating cybersecurity as a collaborative effort and regularly exercising incident response plans was a key takeaway.</p>

<h1 id="cloud-readiness-panel">Cloud Readiness Panel</h1>

<p>
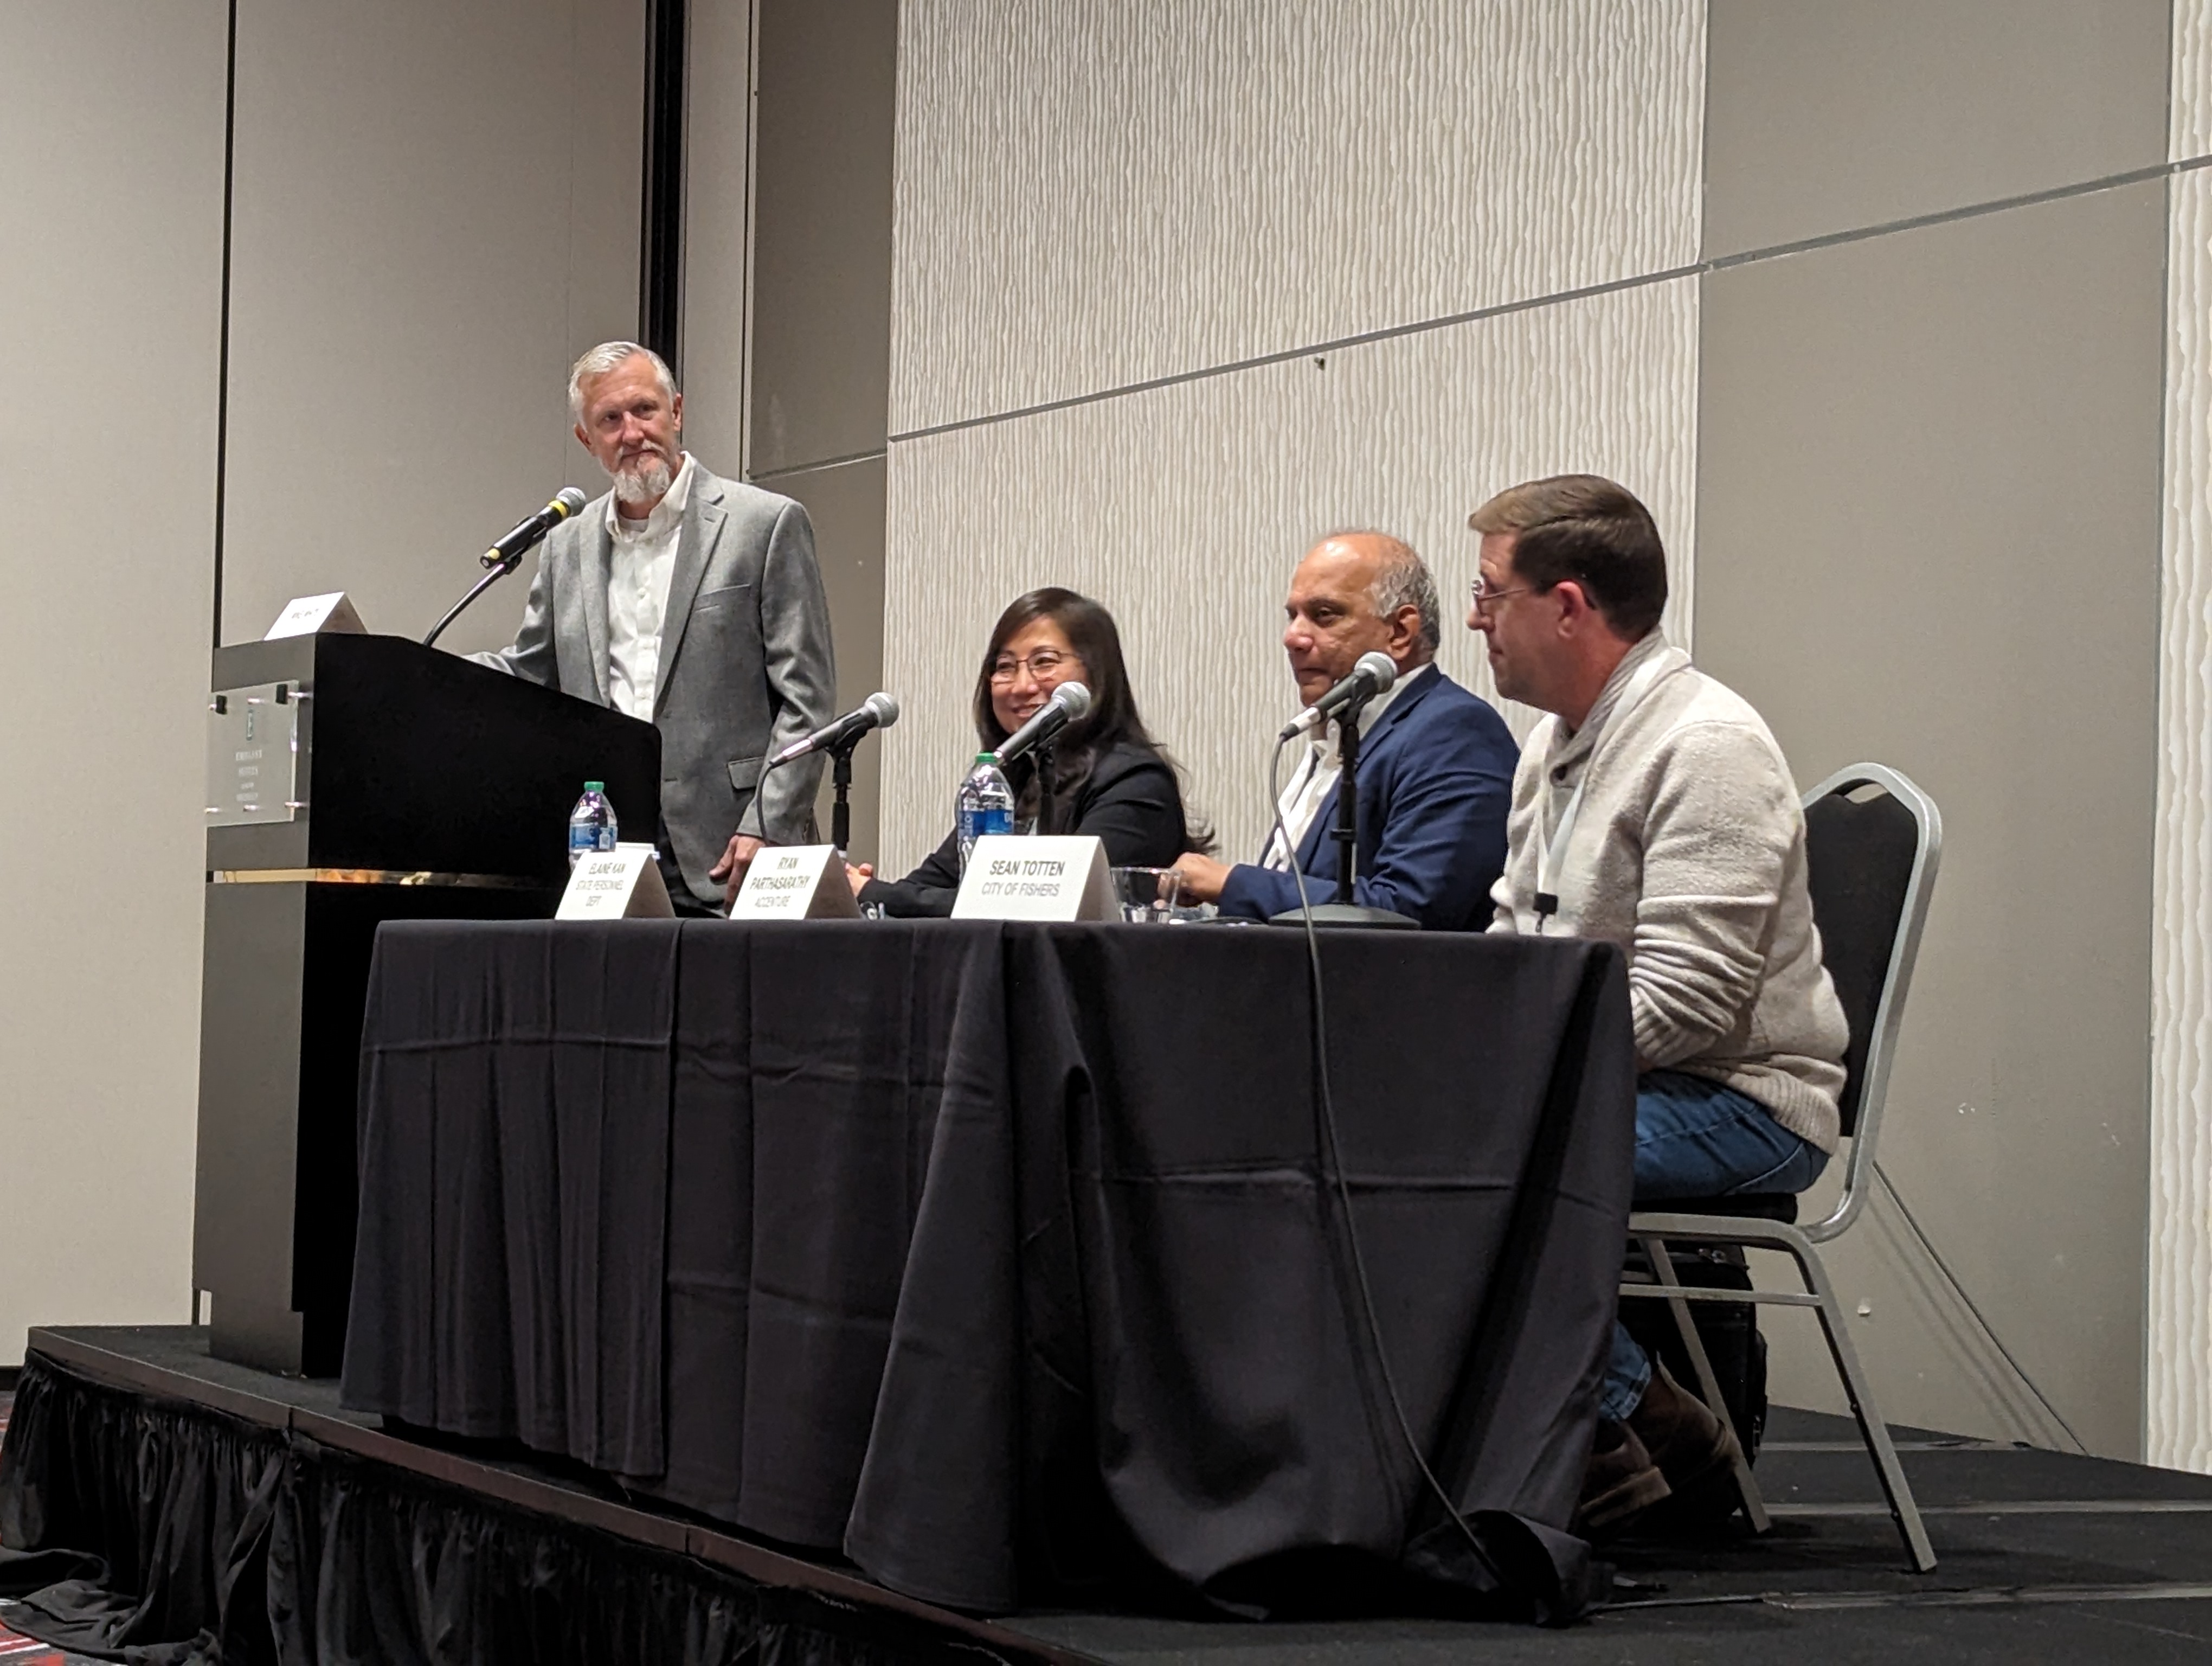
Moderated by Mike White (Deputy Chief Technology Officer, IN.gov and Payment Processing Programs, Office of Technology, State of Indiana), the session on cloud readiness featured insights from Elaine Kan (Chief Technology Officer, State Personnel Department, State of Indiana), Ryan Parthasarathy (Managing Director, Accenture), and Sean Totten (Chief Security Officer, Information Technology, City of Fishers). The panel stressed collaborative efforts in understanding shared responsibility models, tailoring security to diverse data types, and implementing effective tagging practices. The need for leadership involvement were highlighted, along with the importance of documenting cloud architecture and maintaining stringent security measures. Vendor relationships and upskilling initiatives were emphasized as well.
<img src="/assets/2023-12-15/session_ready_for_cloud.jpg" alt="" /></p>

<h1 id="featured-speaker---navigating-your-cyber-future">Featured Speaker - “Navigating Your Cyber Future”</h1>

<p>
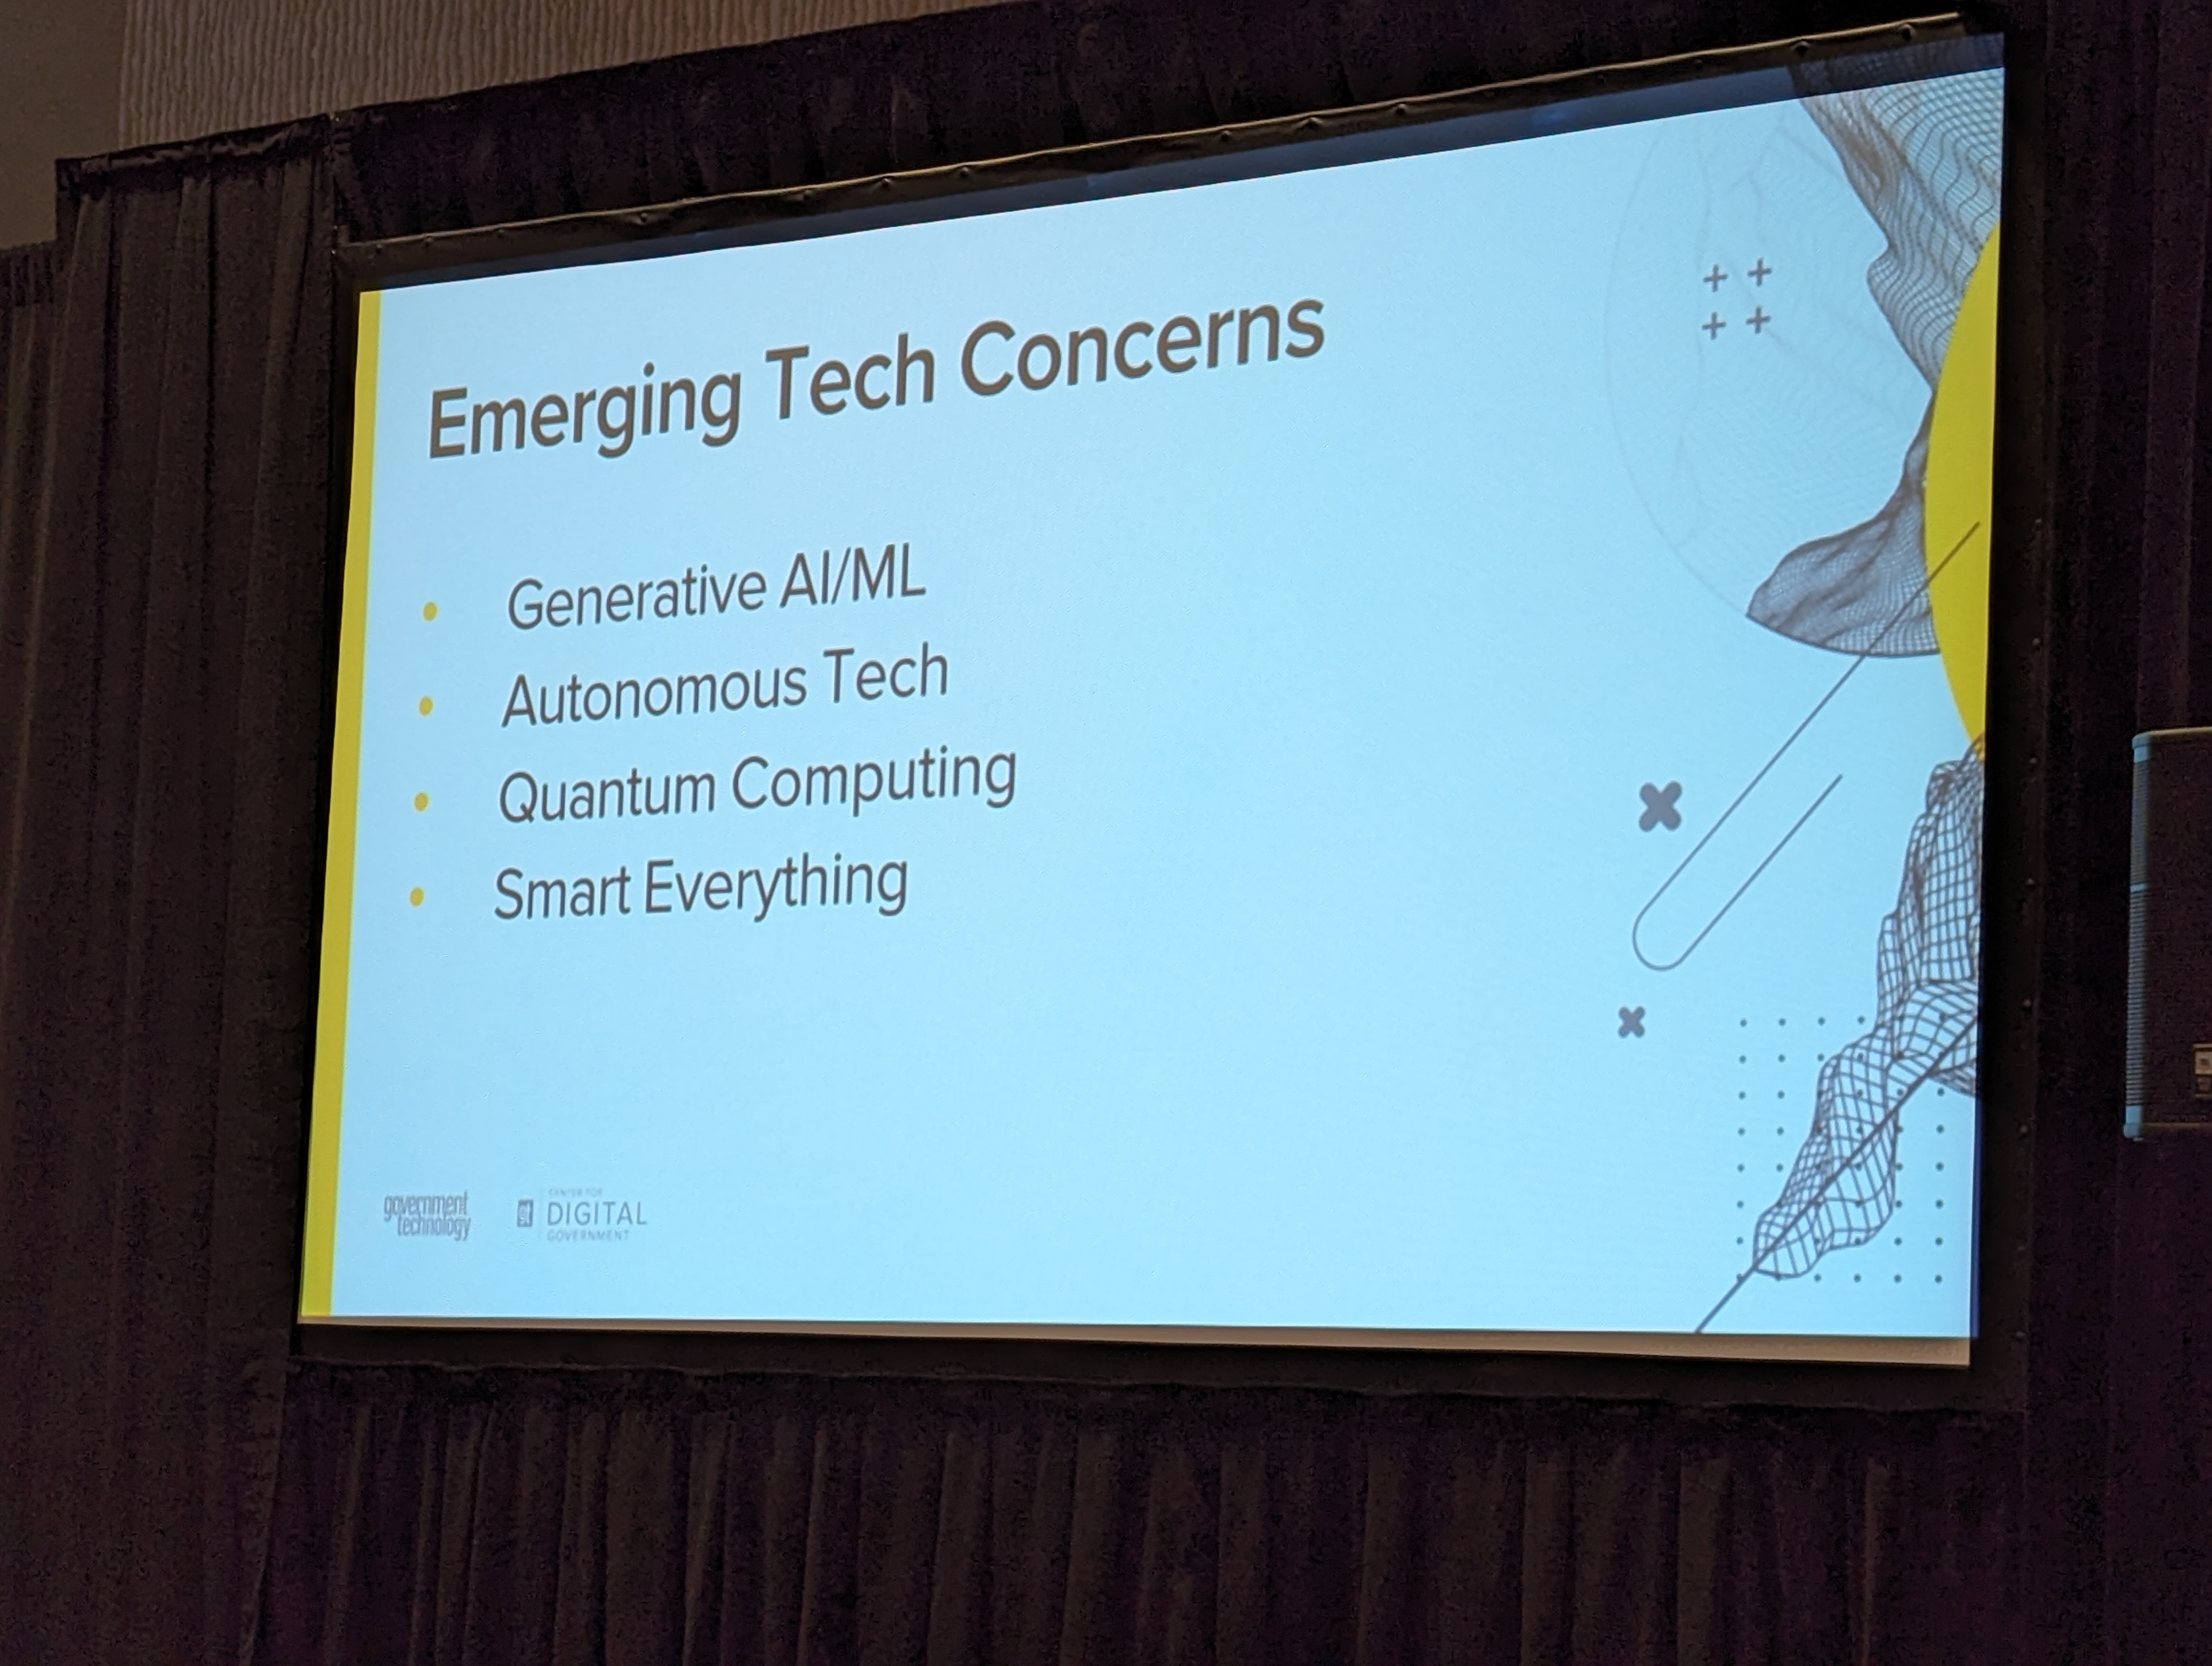
Dan Lohrmann’s (Senior Fellow, Center for Digital Government) presentation focused on navigating the cyber future, emphasizing the value of tabletop discussions and using current events as exercises. He highlighted the growing threat of hacktivism fueled by social media and the potential impact of quantum computing on decryption. Lohrmann stressed the need to embrace emerging technologies like Generative AI, stating, “We got to get to yes.”
<img src="/assets/2023-12-15/final_feature_speaker.jpg" alt="" /></p>

<h1 id="final-thoughts">Final Thoughts</h1>

<p>In conclusion, the 2023 Indiana Public Sector Cybersecurity Summit provided a wealth of knowledge and insights, emphasizing the collaborative nature of cybersecurity efforts and the need for ongoing vigilance and adaptation in the face of evolving threats. The summit served as an invaluable platform for professionals to exchange ideas and strategies, ultimately contributing to a more resilient and secure public sector in Indiana.</p>]]></content><author><name>Drew Davis</name><email>myblog@davisdre.com</email></author><summary type="html"><![CDATA[Overview]]></summary></entry><entry><title type="html">How to use MariaDB on Synology NAS with Docker</title><link href="/2023/10/14/How_to_user_MariaDB_on_Synology_NAS_with_Docker.html" rel="alternate" type="text/html" title="How to use MariaDB on Synology NAS with Docker" /><published>2023-10-14T00:00:00+00:00</published><updated>2023-10-14T00:00:00+00:00</updated><id>/2023/10/14/How_to_user_MariaDB_on_Synology_NAS_with_Docker</id><content type="html" xml:base="/2023/10/14/How_to_user_MariaDB_on_Synology_NAS_with_Docker.html"><![CDATA[<h1 id="introduction">Introduction</h1>
<p>In this blog post, I will share with you how I was able to use MariaDB on my Synology NAS DS 220+ and connect it to a docker container that is also Hosted on my Synology NAS. This also assumes you are ready have MariaDB installed and configured on your Synology NAS. For our example I’ll show you how to setup Monica, an open-source personal CRM which helps you organize your social interactions.</p>

<h1 id="setup-database">Setup database</h1>
<p>First, I created a new database by SSH into my Synology NAS and logging into the MariaDB command line interface and running the following code:</p>
<div class="language-sql highlighter-rouge"><div class="highlight"><pre class="highlight"><code><span class="k">CREATE</span> <span class="k">DATABASE</span> <span class="n">IF</span> <span class="k">NOT</span> <span class="k">EXISTS</span> <span class="n">monica_db</span><span class="p">;</span>

<span class="k">CREATE</span> <span class="k">USER</span> <span class="s1">'monica_user'</span><span class="o">@</span><span class="s1">'172.17.0.%'</span> <span class="n">IDENTIFIED</span> <span class="k">BY</span> <span class="s1">'PASSWORD'</span><span class="p">;</span>

<span class="k">GRANT</span> <span class="k">ALL</span> <span class="k">ON</span> <span class="n">monica_db</span><span class="p">.</span><span class="o">*</span> <span class="k">TO</span> <span class="s1">'monica_user'</span><span class="o">@</span><span class="s1">'172.17.0.%'</span><span class="p">;</span>
</code></pre></div></div>
<p>This code creates a new database called monica_db and a new user called monica_user with the password PASSWORD. The user has access to the database from any IP address that starts with 172.17.0, which is the default network for docker containers on Synology NAS.</p>

<h1 id="setup-docker-container">Setup Docker Container</h1>
<p>Next, I went into the Container Manager app in the Synology NAS and downloaded the Monica:latest registry. I create a new folder in my Docker volume where I keep all of the Docker container persistence data. I created a new container, made sure to use Monica:lastest image, made sure to attach my folder to the container in the configuration along with adding the following environment variables:</p>
<div class="language-plaintext highlighter-rouge"><div class="highlight"><pre class="highlight"><code>DB_PORT=3306
DB_DATABASE=monica_db
DB_USERNAME=monica_user
DB_PASSWORD=PASSWORD
DB_HOST=192.168.1.81
</code></pre></div></div>
<p>These environment variables tell the Monica container how to connect to the MariaDB database that we created earlier. The DB_HOST is the IP address of my Synology NAS on my local network.</p>

<p>Then I clicked finish/build, waited about 15 minutes (at least for me) for the build to complete. You can follow its progress by going into the container and keeping an eye on the ‘log’ section.</p>

<h1 id="accessing-monica">Accessing Monica</h1>
<p>Finally I open up my web browser to <a href="http:/192.168.1.81:8080">http://192.168.1.81:8080</a>, I set up the user, which is the admin of application, and I was good to go from there. Now you can enjoy your own self-hosted personal CRM.
<img src="/assets/2023-10-14/Screenshot%202023-10-14%20134538.png" alt="" /></p>

<h1 id="conclusion">Conclusion</h1>
<p>Congratulations! You have successfully set up a Docker container using MariaDB that is hosted on your Synology NAS. I hope you enjoyed reading this blog post and learned something new from it. If you did, please consider supporting me and my work by buying me a coffee via <a href="https://www.buymeacoffee.com/davisdredotcom">buymeacoffee.com</a>. It’s a simple and easy way to show your appreciation and help me keep creating more content like this. Thank you for your time and attention. Have a great day!</p>

<p><a href="https://www.buymeacoffee.com/davisdredotcom" target="_blank"><img src="https://cdn.buymeacoffee.com/buttons/v2/default-yellow.png" alt="Buy Me A Coffee" style="height: 60px !important;width: 217px !important; margin:auto; display:block;" /></a></p>]]></content><author><name>Drew Davis</name><email>myblog@davisdre.com</email></author><summary type="html"><![CDATA[Introduction In this blog post, I will share with you how I was able to use MariaDB on my Synology NAS DS 220+ and connect it to a docker container that is also Hosted on my Synology NAS. This also assumes you are ready have MariaDB installed and configured on your Synology NAS. For our example I’ll show you how to setup Monica, an open-source personal CRM which helps you organize your social interactions.]]></summary></entry><entry><title type="html">Self-Hosting Gitea on Synology NAS with Docker and MariaDB</title><link href="/2023/08/27/Self-Hosting_Gitea_on_Synology_NAS_with_Docker_and_MariaDB.html" rel="alternate" type="text/html" title="Self-Hosting Gitea on Synology NAS with Docker and MariaDB" /><published>2023-08-27T00:00:00+00:00</published><updated>2023-08-27T00:00:00+00:00</updated><id>/2023/08/27/Self-Hosting_Gitea_on_Synology_NAS_with_Docker_and_MariaDB</id><content type="html" xml:base="/2023/08/27/Self-Hosting_Gitea_on_Synology_NAS_with_Docker_and_MariaDB.html"><![CDATA[<h1 id="introduction">Introduction</h1>
<p>In this blog post, I will share with you how I am self-hosting Gitea on my Synology Nas DS 220+. Gitea is a lightweight and open source Git service that allows you to create and manage your own repositories, issues, pull requests, and more. Self-hosting means that you run the service on your own hardware, instead of relying on a third-party provider. This gives you more control, privacy, and customization options for your Git projects.</p>

<h1 id="prerequisites">Prerequisites</h1>
<ul>
  <li>Hardware: Synology NAS (mine is DS220+)</li>
  <li>Software: Container (formely Docker), MariaDB 10 packages</li>
</ul>

<h1 id="installation-steps">Installation Steps</h1>
<p>Now lets get into the setup.</p>

<h2 id="setting-up-mariadb">Setting up MariaDB</h2>
<p>If you want to use MariaDB as the database backend for Gitea, you need to do some configuration steps. Here is a quick guide on how to set up MariaDB on a Synology NAS:</p>

<ol>
  <li>Install MariaDB package via Synology Package Center. You can find it under the Database category. Follow the instructions to complete the installation.</li>
  <li>Create a new database and a user for Gitea via mysql console. You can access the mysql console by logging in to your NAS via SSH and typing <code class="language-plaintext highlighter-rouge">mysql -u root -p</code>. Enter the root password that you set during the installation of MariaDB.
2.1 Grant privileges to the user that you created for Gitea. For example, if your database name is <code class="language-plaintext highlighter-rouge">gitea_db</code> and your user name is <code class="language-plaintext highlighter-rouge">gitea_user</code>, you can use the following commands:</li>
</ol>

<div class="language-sql highlighter-rouge"><div class="highlight"><pre class="highlight"><code><span class="k">CREATE</span> <span class="k">DATABASE</span> <span class="n">gitea_db</span><span class="p">;</span>
<span class="k">CREATE</span> <span class="k">USER</span> <span class="s1">'gitea_user'</span><span class="o">@</span><span class="s1">'localhost'</span> <span class="n">IDENTIFIED</span> <span class="k">BY</span> <span class="s1">'your_password'</span><span class="p">;</span>
<span class="k">GRANT</span> <span class="k">ALL</span> <span class="k">PRIVILEGES</span> <span class="k">ON</span> <span class="n">gitea_db</span><span class="p">.</span><span class="o">*</span> <span class="k">TO</span> <span class="s1">'gitea_user'</span><span class="o">@</span><span class="s1">'localhost'</span><span class="p">;</span>
<span class="n">FLUSH</span> <span class="k">PRIVILEGES</span><span class="p">;</span>
</code></pre></div></div>
<p>That’s it! You have successfully set up MariaDB for Gitea on your Synology NAS. You can now proceed to install Gitea and configure it to use the database that you created.</p>

<h2 id="configuring-docker-and-gitea">Configuring Docker and Gitea</h2>

<ol>
  <li>Install MariaDB package via Synology Package Center. You can find it under the Utilities category. Follow the instructions to complete the installation.</li>
  <li>You will need to create a docker-compose.yml file in a folder of your choice. This file will define the configuration of the Gitea container, such as the ports, volumes, networks, and environment variables. NOTE, create a new volume in File Station Package so all storage is persistent and save this docker-compose.yml file in it. You can use the following template as a reference:</li>
</ol>

<div class="language-yaml highlighter-rouge"><div class="highlight"><pre class="highlight"><code><span class="na">version</span><span class="pi">:</span> <span class="s2">"</span><span class="s">3"</span>

<span class="na">networks</span><span class="pi">:</span>
  <span class="na">gitea</span><span class="pi">:</span>
    <span class="na">external</span><span class="pi">:</span> <span class="kc">false</span>

<span class="na">services</span><span class="pi">:</span>
  <span class="na">server</span><span class="pi">:</span>
    <span class="na">image</span><span class="pi">:</span> <span class="s">gitea/gitea:latest</span>
    <span class="na">container_name</span><span class="pi">:</span> <span class="s">gitea</span>
    <span class="na">environment</span><span class="pi">:</span>
      <span class="pi">-</span> <span class="s">USER_UID=YOUR-UID</span>
      <span class="pi">-</span> <span class="s">USER_GID=YOUR-GID</span>
      <span class="pi">-</span> <span class="s">GITEA__database__DB_TYPE=mysql</span>
      <span class="pi">-</span> <span class="s">GITEA__database__HOST=THE-IP-OF-YOUR-DATABASE</span>
      <span class="pi">-</span> <span class="s">GITEA__database__NAME=gitea</span>
      <span class="pi">-</span> <span class="s">GITEA__database__USER=gitea</span>
      <span class="pi">-</span> <span class="s">GITEA__database__PASSWD=YOUR-PASSWORD</span>
    <span class="na">restart</span><span class="pi">:</span> <span class="s">always</span>
    <span class="na">networks</span><span class="pi">:</span>
      <span class="pi">-</span> <span class="s">gitea</span>
    <span class="na">volumes</span><span class="pi">:</span>
      <span class="pi">-</span> <span class="s">/volume1/docker/gitea/gitea:/data</span>
    <span class="na">ports</span><span class="pi">:</span>
      <span class="pi">-</span> <span class="s2">"</span><span class="s">3000:3000"</span>
      <span class="pi">-</span> <span class="s2">"</span><span class="s">222:22"</span>
</code></pre></div></div>

<ol>
  <li>You will need to open the Container Packege and Create a new project. Project name I gave was ‘gitea’ and the Path was the volume I created in the File Station and where I stored my docker-compose.yml. It should auto detect your docker-compose.yml and then click Next. This will build out your Docker environment for Gitea.</li>
  <li>Now you can access the Gitea web UI by opening your browser and typing:
<strong>http://your.synology.ip:3000</strong>
You will be greeted by a page that asks you to complete the initial configuration of Gitea. Here you will need to enter some basic information, such as the site title, the admin account details, and the database settings. Make sure that the database settings match the ones that you specified in the docker-compose.yml file.</li>
</ol>

<h1 id="accessing-gitea">Accessing Gitea</h1>
<p>Once you have completed the initial configuration, you can log in with your admin account and start using Gitea. You can create new repositories, users, organizations, teams, and more. You can also configure various settings for your Gitea instance, such as authentication methods, email notifications, webhooks, etc.
<img src="/assets/2023-08-27/Screenshot%202023-08-27%20183945.png" alt="" /></p>

<h1 id="conclusion">Conclusion</h1>
<p>Congratulations! You have successfully set up a self-hosted Gitea service using Docker on your Synology NAS. I hope you enjoyed reading this blog post and learned something new from it. If you did, please consider supporting me and my work by buying me a coffee via <a href="https://www.buymeacoffee.com/davisdredotcom">buymeacoffee.com</a>. It’s a simple and easy way to show your appreciation and help me keep creating more content like this. Thank you for your time and attention. Have a great day!</p>

<p><a href="https://www.buymeacoffee.com/davisdredotcom" target="_blank"><img src="https://cdn.buymeacoffee.com/buttons/v2/default-yellow.png" alt="Buy Me A Coffee" style="height: 60px !important;width: 217px !important; margin:auto; display:block;" /></a></p>]]></content><author><name>Drew Davis</name><email>myblog@davisdre.com</email></author><summary type="html"><![CDATA[Introduction In this blog post, I will share with you how I am self-hosting Gitea on my Synology Nas DS 220+. Gitea is a lightweight and open source Git service that allows you to create and manage your own repositories, issues, pull requests, and more. Self-hosting means that you run the service on your own hardware, instead of relying on a third-party provider. This gives you more control, privacy, and customization options for your Git projects.]]></summary></entry><entry><title type="html">Configure an AWS static site with Cloudflare</title><link href="/2023/08/08/Configure-AWS-s3-with-cloudflare.html" rel="alternate" type="text/html" title="Configure an AWS static site with Cloudflare" /><published>2023-08-08T00:00:00+00:00</published><updated>2023-08-08T00:00:00+00:00</updated><id>/2023/08/08/Configure-AWS-s3-with-cloudflare</id><content type="html" xml:base="/2023/08/08/Configure-AWS-s3-with-cloudflare.html"><![CDATA[<h1 id="configure-an-aws-static-site-with-cloudflare">Configure an AWS static site with Cloudflare</h1>
<p>In this blog post, I will share how I configured an Amazon Web Services (AWS) static site to use Cloudflare as its proxy. This setup allows me to benefit from Cloudflare’s security and performance features, such as SSL encryption, caching, and firewall.</p>

<p>The first step was to create an Amazon S3 bucket and give it the name of my sub-domain. For example, if my domain name is example.com, I named my bucket blog.example.com. This is important because it allows Cloudflare to recognize the bucket as the origin server for the sub-domain.</p>

<p>The next step was to add a S3 bucket policy to only allow access from Cloudflare. This way, I can prevent anyone from accessing my site directly through the S3 URL, and force them to go through Cloudflare instead. The bucket policy looks like this:</p>

<div class="language-json highlighter-rouge"><div class="highlight"><pre class="highlight"><code><span class="p">{</span><span class="w">
    </span><span class="nl">"Version"</span><span class="p">:</span><span class="w"> </span><span class="s2">"2012-10-17"</span><span class="p">,</span><span class="w">
    </span><span class="nl">"Statement"</span><span class="p">:</span><span class="w"> </span><span class="p">[</span><span class="w">
        </span><span class="p">{</span><span class="w">
            </span><span class="nl">"Sid"</span><span class="p">:</span><span class="w"> </span><span class="s2">"Allow Cloudflare"</span><span class="p">,</span><span class="w">
            </span><span class="nl">"Effect"</span><span class="p">:</span><span class="w"> </span><span class="s2">"Allow"</span><span class="p">,</span><span class="w">
            </span><span class="nl">"Principal"</span><span class="p">:</span><span class="w"> </span><span class="s2">"*"</span><span class="p">,</span><span class="w">
            </span><span class="nl">"Action"</span><span class="p">:</span><span class="w"> </span><span class="s2">"s3:GetObject"</span><span class="p">,</span><span class="w">
            </span><span class="nl">"Resource"</span><span class="p">:</span><span class="w"> </span><span class="s2">"arn:aws:s3:::blog.example.com/*"</span><span class="p">,</span><span class="w">
            </span><span class="nl">"Condition"</span><span class="p">:</span><span class="w"> </span><span class="p">{</span><span class="w">
                </span><span class="nl">"IpAddress"</span><span class="p">:</span><span class="w"> </span><span class="p">{</span><span class="w">
                    </span><span class="nl">"aws:SourceIp"</span><span class="p">:</span><span class="w"> </span><span class="p">[</span><span class="w">
                        </span><span class="s2">"173.245.48.0/20"</span><span class="p">,</span><span class="w">
                        </span><span class="s2">"103.21.244.0/22"</span><span class="p">,</span><span class="w">
                        </span><span class="s2">"103.22.200.0/22"</span><span class="p">,</span><span class="w">
                        </span><span class="s2">"103.31.4.0/22"</span><span class="p">,</span><span class="w">
                        </span><span class="s2">"141.101.64.0/18"</span><span class="p">,</span><span class="w">
                        </span><span class="s2">"108.162.192.0/18"</span><span class="p">,</span><span class="w">
                        </span><span class="s2">"190.93.240.0/20"</span><span class="p">,</span><span class="w">
                        </span><span class="s2">"188.114.96.0/20"</span><span class="p">,</span><span class="w">
                        </span><span class="s2">"97.234.240.0/22"</span><span class="p">,</span><span class="w">
                        </span><span class="s2">"198.41.128.0/17"</span><span class="p">,</span><span class="w">
                        </span><span class="s2">"162.158.0.0/15"</span><span class="p">,</span><span class="w">
                        </span><span class="s2">"104.16.0.0/13"</span><span class="p">,</span><span class="w">
                        </span><span class="s2">"104.24.0.0/14"</span><span class="p">,</span><span class="w">
                        </span><span class="s2">"172.64.0.0/13"</span><span class="p">,</span><span class="w">
                        </span><span class="s2">"131.0.72.0/22"</span><span class="p">,</span><span class="w">
                        </span><span class="s2">"2400:cb00::/32"</span><span class="p">,</span><span class="w">
                        </span><span class="s2">"2606:4700::/32"</span><span class="p">,</span><span class="w">
                        </span><span class="s2">"2803:f800::/32"</span><span class="p">,</span><span class="w">
                        </span><span class="s2">"2405:b500::/32"</span><span class="p">,</span><span class="w">
                        </span><span class="s2">"2405:8100::/32"</span><span class="p">,</span><span class="w">
                        </span><span class="s2">"2a06:98c0::/29"</span><span class="p">,</span><span class="w">
                        </span><span class="s2">"2c0f:f248::/32"</span><span class="w">
                    </span><span class="p">]</span><span class="w">
                </span><span class="p">}</span><span class="w">
            </span><span class="p">}</span><span class="w">
        </span><span class="p">}</span><span class="w">
    </span><span class="p">]</span><span class="w">
</span><span class="p">}</span><span class="w">
</span></code></pre></div></div>

<p>The list of IP addresses in the policy corresponds to Cloudflare’s network ranges, which you can find here: https://www.cloudflare.com/ips/</p>

<p>After that, I uploaded my static content to my S3 bucket using the AWS console or a tool like AWS CLI.</p>

<p>The final step was to set up my CNAME record to point my subdomain to my S3 bucket in Cloudflare’s DNS settings.</p>

<p>I also had to add a Page Rule in Cloudflare and set the URL to my subdomain and set SSL to Flexible.</p>

<p>This means that Cloudflare will encrypt the traffic between the visitor and Cloudflare, but not between Cloudflare and the S3 bucket due to by default only HTTP is used when enabling the S3 bucket for static website hosting.</p>

<p>Once that was all fully configured, my static website was up and running with Cloudflare as its proxy.</p>

<p><img src="/assets/2023-08-08/Screenshot-2023-08-08.png" alt="My AWS static site" /></p>

<p>I hope you enjoyed reading this blog post and learned something new from it. If you did, please consider supporting me and my work by buying me a coffee via <a href="https://www.buymeacoffee.com/davisdredotcom">buymeacoffee.com</a>. It’s a simple and easy way to show your appreciation and help me keep creating more content like this. Thank you for your time and attention. Have a great day!</p>

<p><a href="https://www.buymeacoffee.com/davisdredotcom" target="_blank"><img src="https://cdn.buymeacoffee.com/buttons/v2/default-yellow.png" alt="Buy Me A Coffee" style="height: 60px !important;width: 217px !important; margin:auto; display:block;" /></a></p>]]></content><author><name>Drew Davis</name><email>myblog@davisdre.com</email></author><summary type="html"><![CDATA[Configure an AWS static site with Cloudflare In this blog post, I will share how I configured an Amazon Web Services (AWS) static site to use Cloudflare as its proxy. This setup allows me to benefit from Cloudflare’s security and performance features, such as SSL encryption, caching, and firewall. The first step was to create an Amazon S3 bucket and give it the name of my sub-domain. For example, if my domain name is example.com, I named my bucket blog.example.com. This is important because it allows Cloudflare to recognize the bucket as the origin server for the sub-domain. The next step was to add a S3 bucket policy to only allow access from Cloudflare. This way, I can prevent anyone from accessing my site directly through the S3 URL, and force them to go through Cloudflare instead. The bucket policy looks like this: { "Version": "2012-10-17", "Statement": [ { "Sid": "Allow Cloudflare", "Effect": "Allow", "Principal": "*", "Action": "s3:GetObject", "Resource": "arn:aws:s3:::blog.example.com/*", "Condition": { "IpAddress": { "aws:SourceIp": [ "173.245.48.0/20", "103.21.244.0/22", "103.22.200.0/22", "103.31.4.0/22", "141.101.64.0/18", "108.162.192.0/18", "190.93.240.0/20", "188.114.96.0/20", "97.234.240.0/22", "198.41.128.0/17", "162.158.0.0/15", "104.16.0.0/13", "104.24.0.0/14", "172.64.0.0/13", "131.0.72.0/22", "2400:cb00::/32", "2606:4700::/32", "2803:f800::/32", "2405:b500::/32", "2405:8100::/32", "2a06:98c0::/29", "2c0f:f248::/32" ] } } } ] } The list of IP addresses in the policy corresponds to Cloudflare’s network ranges, which you can find here: https://www.cloudflare.com/ips/ After that, I uploaded my static content to my S3 bucket using the AWS console or a tool like AWS CLI. The final step was to set up my CNAME record to point my subdomain to my S3 bucket in Cloudflare’s DNS settings. I also had to add a Page Rule in Cloudflare and set the URL to my subdomain and set SSL to Flexible. This means that Cloudflare will encrypt the traffic between the visitor and Cloudflare, but not between Cloudflare and the S3 bucket due to by default only HTTP is used when enabling the S3 bucket for static website hosting. Once that was all fully configured, my static website was up and running with Cloudflare as its proxy. I hope you enjoyed reading this blog post and learned something new from it. If you did, please consider supporting me and my work by buying me a coffee via buymeacoffee.com. It’s a simple and easy way to show your appreciation and help me keep creating more content like this. Thank you for your time and attention. Have a great day!]]></summary></entry><entry><title type="html">Discover The Benefits Of AWS CloudFormation</title><link href="/2023/07/19/AWS-CloudFormation_Journey.html" rel="alternate" type="text/html" title="Discover The Benefits Of AWS CloudFormation" /><published>2023-07-19T00:00:00+00:00</published><updated>2023-07-19T00:00:00+00:00</updated><id>/2023/07/19/AWS-CloudFormation_Journey</id><content type="html" xml:base="/2023/07/19/AWS-CloudFormation_Journey.html"><![CDATA[<h1 id="discover-the-benefits-of-aws-cloudformation">Discover The Benefits Of AWS CloudFormation</h1>
<p>Hey, everyone! I’m back with another post about my journey with AWS CloudFormation. This time, I want to share with you how I created a VPC using a YAML template. A VPC is a virtual private cloud that lets you isolate your AWS resources from the public internet. It’s pretty cool and useful, trust me.</p>

<p>So, how did I do it? Well, first of all, I needed to define a parameter for the VPC CIDR, which is the range of IP addresses that the VPC can use. I did this by adding a ‘Parameters’ section in my template and specifying the ‘Type’, ‘Default’ and ‘Description’ of the parameter. Here’s what it looked like:</p>

<div class="language-yaml highlighter-rouge"><div class="highlight"><pre class="highlight"><code><span class="na">Parameters</span><span class="pi">:</span>
 <span class="na">VPCCIDR</span><span class="pi">:</span>
  <span class="na">Type</span><span class="pi">:</span> <span class="s">String</span>
  <span class="na">Default</span><span class="pi">:</span> <span class="s">10.0.0.0/16</span>
  <span class="na">Description</span><span class="pi">:</span> <span class="s">The CIDR block for the VPC</span>
</code></pre></div></div>

<p>Next, I needed to create the VPC resource itself. I did this by adding a ‘Resources’ section in my template and specifying the ‘Type’, ‘Properties’ and ‘Metadata’ of the resource. The most important thing here was to give the VPC a name tag using the ‘!Sub’ function of the stack name. This way, I could easily identify which VPC belonged to which stack. Here’s what it looked like:</p>

<div class="language-yaml highlighter-rouge"><div class="highlight"><pre class="highlight"><code><span class="na">Resources</span><span class="pi">:</span>
 <span class="na">MyVPC</span><span class="pi">:</span>
  <span class="na">Type</span><span class="pi">:</span> <span class="s">AWS::EC2::VPC</span>
  <span class="na">Properties</span><span class="pi">:</span>
   <span class="na">CidrBlock</span><span class="pi">:</span> <span class="kt">!Ref</span> <span class="s">VPCCIDR</span>
   <span class="na">EnableDnsSupport</span><span class="pi">:</span> <span class="kc">true</span>
   <span class="na">EnableDnsHostnames</span><span class="pi">:</span> <span class="kc">true</span>
   <span class="na">Tags</span><span class="pi">:</span>
    <span class="pi">-</span> <span class="na">Key</span><span class="pi">:</span> <span class="s">Name</span>
     <span class="na">Value</span><span class="pi">:</span> <span class="kt">!Sub</span> <span class="s">${AWS::StackName}-VPC</span>
  <span class="na">Metadata</span><span class="pi">:</span>
   <span class="na">Comment</span><span class="pi">:</span> <span class="s">Create a VPC</span>
</code></pre></div></div>

<p>After I finished writing my template, I saved it as a YAML file. Then, I downloaded and installed AWS CLI on my laptop so that I could deploy my template via the command line. I ran the following command to create a stack named ‘MyVPCStack’ in the us-east-2 region:</p>

<div class="language-bash highlighter-rouge"><div class="highlight"><pre class="highlight"><code>aws cloudformation deploy <span class="nt">--stack-name</span> MyVPCStack <span class="nt">--template-file</span> .<span class="se">\m</span>y-vpc-template.yaml <span class="nt">--region</span> us-east-2
</code></pre></div></div>

<p>And bingo! My VPC was created in a matter of minutes. I could see it in the AWS console and verify that it had the correct CIDR block and name tag. I was so proud of myself!</p>

<p>But wait, there’s more. I also learned how to delete my stack using the AWS Toolkit for VS Code. This is a handy extension that lets you interact with your AWS resources from within your VS code editor. I simply right clicked on my stack name in the AWS Explorer and selected ‘Delete’. Then, I confirmed that I wanted to delete the stack and all its resources.</p>

<p>And that’s it! My VPC was gone, just like that. No hassle, no waste, no regrets.</p>

<h1 id="support">Support</h1>
<p>I hope you enjoyed reading this blog post and learned something new from it. If you did, please consider supporting me and my work by buying me a coffee via <a href="https://www.buymeacoffee.com/davisdredotcom">buymeacoffee.com</a>. It’s a simple and easy way to show your appreciation and help me keep creating more content like this. Thank you for your time and attention. Have a great day!</p>

<p><a href="https://www.buymeacoffee.com/davisdredotcom" target="_blank"><img src="https://cdn.buymeacoffee.com/buttons/v2/default-yellow.png" alt="Buy Me A Coffee" style="height: 60px !important;width: 217px !important; margin:auto; display:block;" /></a></p>]]></content><author><name>Drew Davis</name><email>myblog@davisdre.com</email></author><summary type="html"><![CDATA[Discover The Benefits Of AWS CloudFormation Hey, everyone! I’m back with another post about my journey with AWS CloudFormation. This time, I want to share with you how I created a VPC using a YAML template. A VPC is a virtual private cloud that lets you isolate your AWS resources from the public internet. It’s pretty cool and useful, trust me. So, how did I do it? Well, first of all, I needed to define a parameter for the VPC CIDR, which is the range of IP addresses that the VPC can use. I did this by adding a ‘Parameters’ section in my template and specifying the ‘Type’, ‘Default’ and ‘Description’ of the parameter. Here’s what it looked like: Parameters: VPCCIDR: Type: String Default: 10.0.0.0/16 Description: The CIDR block for the VPC Next, I needed to create the VPC resource itself. I did this by adding a ‘Resources’ section in my template and specifying the ‘Type’, ‘Properties’ and ‘Metadata’ of the resource. The most important thing here was to give the VPC a name tag using the ‘!Sub’ function of the stack name. This way, I could easily identify which VPC belonged to which stack. Here’s what it looked like: Resources: MyVPC: Type: AWS::EC2::VPC Properties: CidrBlock: !Ref VPCCIDR EnableDnsSupport: true EnableDnsHostnames: true Tags: - Key: Name Value: !Sub ${AWS::StackName}-VPC Metadata: Comment: Create a VPC After I finished writing my template, I saved it as a YAML file. Then, I downloaded and installed AWS CLI on my laptop so that I could deploy my template via the command line. I ran the following command to create a stack named ‘MyVPCStack’ in the us-east-2 region: aws cloudformation deploy --stack-name MyVPCStack --template-file .\my-vpc-template.yaml --region us-east-2 And bingo! My VPC was created in a matter of minutes. I could see it in the AWS console and verify that it had the correct CIDR block and name tag. I was so proud of myself! But wait, there’s more. I also learned how to delete my stack using the AWS Toolkit for VS Code. This is a handy extension that lets you interact with your AWS resources from within your VS code editor. I simply right clicked on my stack name in the AWS Explorer and selected ‘Delete’. Then, I confirmed that I wanted to delete the stack and all its resources. And that’s it! My VPC was gone, just like that. No hassle, no waste, no regrets. Support I hope you enjoyed reading this blog post and learned something new from it. If you did, please consider supporting me and my work by buying me a coffee via buymeacoffee.com. It’s a simple and easy way to show your appreciation and help me keep creating more content like this. Thank you for your time and attention. Have a great day!]]></summary></entry><entry><title type="html">Setting Up and Upgrading Gitea on Synology NAS Using Docker</title><link href="/2023/04/26/setting-up-and-upgrading-gitea-on-synology.html" rel="alternate" type="text/html" title="Setting Up and Upgrading Gitea on Synology NAS Using Docker" /><published>2023-04-26T00:00:00+00:00</published><updated>2023-04-26T00:00:00+00:00</updated><id>/2023/04/26/setting-up-and-upgrading-gitea-on-synology</id><content type="html" xml:base="/2023/04/26/setting-up-and-upgrading-gitea-on-synology.html"><![CDATA[<h1 id="introduction">Introduction</h1>

<p>In this blog post, we’ll discuss how to set up a Gitea container on a Synology NAS (DS220+) using Docker. Gitea is a lightweight, self-hosted Git service that allows you to create and manage repositories for storing code snippets. We’ll also cover the process of upgrading the Gitea container to the latest version when a new release is made.</p>

<h2 id="part-1-setting-up-gitea-on-synology-nas-using-docker">Part 1: Setting Up Gitea on Synology NAS Using Docker</h2>

<h3 id="step-1-install-docker-on-synology-nas">Step 1: Install Docker on Synology NAS</h3>

<p>Open the DiskStation Manager (DSM) web interface.
Navigate to the Package Center, search for “Docker,” and click “Install.”</p>
<h3 id="step-2-set-up-a-gitea-container">Step 2: Set up a Gitea container</h3>

<p>Open the Docker app in DSM.
Navigate to the “Registry” tab, search for “gitea,” and download the official Gitea image (gitea/gitea).</p>
<h3 id="step-3-create-and-configure-the-gitea-container">Step 3: Create and configure the Gitea container</h3>

<p>In the “Image” tab, select the Gitea image and click “Launch.”
Configure the container settings, including the container name, volume mappings, network ports, and auto-restart.</p>
<h3 id="step-4-deploy-the-container">Step 4: Deploy the container</h3>

<p>Review the settings in the “Create Container” window, and click “Apply” to deploy the container.</p>
<h3 id="step-5-access-the-gitea-web-interface">Step 5: Access the Gitea web interface</h3>

<p>Open a web browser and go to http://[NAS_IP]:3000 (replace “[NAS_IP]” with your Synology NAS IP address).
Complete the Gitea setup wizard to configure the admin account, database, and other settings.</p>
<h2 id="part-2-upgrading-gitea-container-to-the-latest-version">Part 2: Upgrading Gitea Container to the Latest Version</h2>

<h3 id="step-1-pull-the-latest-gitea-image">Step 1: Pull the latest Gitea image</h3>

<p>Open the Docker app in DSM.
Go to the “Registry” tab, search for “gitea,” and click “Download.” Select the “latest” tag or the desired version tag.</p>
<h3 id="step-2-stop-and-remove-the-existing-gitea-container">Step 2: Stop and remove the existing Gitea container</h3>

<p>Go to the “Container” tab, stop the current Gitea container, and remove it. This won’t delete the mapped volume data.</p>
<h3 id="step-3-create-a-new-gitea-container-with-the-updated-image">Step 3: Create a new Gitea container with the updated image</h3>

<p>Go to the “Image” tab, select the updated Gitea image, and click “Launch.”
Configure the settings as you did for the original container, ensuring you map the same volume and ports, and enable auto-restart.</p>
<h3 id="step-4-start-the-new-container">Step 4: Start the new container</h3>

<p>Go to the “Container” tab, select the new Gitea container, and click “Start.”</p>
<h1 id="conclusion">Conclusion:</h1>

<p>By following these steps, you can easily set up and upgrade a Gitea container on your Synology NAS using Docker. This provides a simple and convenient way to store and manage your code snippets. Remember to regularly check for updates and repeat the upgrade process as needed to keep your Gitea instance up-to-date and secure.</p>

<p>I hope you enjoyed reading this blog post and learned something new from it. If you did, please consider supporting me and my work by buying me a coffee via <a href="https://www.buymeacoffee.com/davisdredotcom">buymeacoffee.com</a>. It’s a simple and easy way to show your appreciation and help me keep creating more content like this. Thank you for your time and attention. Have a great day!</p>

<p><a href="https://www.buymeacoffee.com/davisdredotcom" target="_blank"><img src="https://cdn.buymeacoffee.com/buttons/v2/default-yellow.png" alt="Buy Me A Coffee" style="height: 60px !important;width: 217px !important; margin:auto; display:block;" /></a></p>]]></content><author><name>Drew Davis</name><email>myblog@davisdre.com</email></author><summary type="html"><![CDATA[Introduction]]></summary></entry><entry><title type="html">How to Upgrade Your Bitwarden Self-Hosted Instance on Linode</title><link href="/2023/04/19/How-to-Upgrade-Your-Bitwarden-Self-Hosted-Instance-on-Linode.html" rel="alternate" type="text/html" title="How to Upgrade Your Bitwarden Self-Hosted Instance on Linode" /><published>2023-04-19T00:00:00+00:00</published><updated>2023-04-19T00:00:00+00:00</updated><id>/2023/04/19/How-to-Upgrade-Your-Bitwarden-Self-Hosted-Instance-on-Linode</id><content type="html" xml:base="/2023/04/19/How-to-Upgrade-Your-Bitwarden-Self-Hosted-Instance-on-Linode.html"><![CDATA[<h1 id="how-to-upgrade-your-bitwarden-self-hosted-instance-on-linode">How to Upgrade Your Bitwarden Self-Hosted Instance on Linode</h1>

<p>If you’re like me, you love using Bitwarden as your password manager. It’s secure, open source, and easy to use. But did you know that you can also host your own Bitwarden server on your own hardware? That way, you have full control over your data and don’t have to rely on any third-party service.</p>

<p>I’ve been running my own Bitwarden server on a Linode VM with Ubuntu for a while now, and it’s been working great. But recently, I noticed that there was a new version of Bitwarden available with some cool new features. So I decided to upgrade my server and see what’s new.</p>

<p>In this blog post, I’ll show you how I upgraded my Bitwarden self-hosted instance on Linode using the standard deployment option . This option uses Docker Compose to run multiple containers for different services such as web vault, API, database, etc. If you’re using the unified deployment option, which runs everything in a single container with different database options, the process might be different.</p>

<h2 id="step-1-backup-your-data">Step 1: Backup Your Data</h2>

<p>Before doing anything else, make sure you backup your data. You don’t want to lose all your passwords if something goes wrong during the upgrade process. To backup your data, follow these steps:</p>

<ul>
  <li>Log into your Linode VM via SSH.</li>
  <li>Navigate to the directory where you installed Bitwarden. For me, it’s <code class="language-plaintext highlighter-rouge">/opt/bitwarden</code>.</li>
  <li>Run <code class="language-plaintext highlighter-rouge">./bitwarden.sh backups</code> to create a backup of your database and attachments.</li>
  <li>Copy the backup file from <code class="language-plaintext highlighter-rouge">./bwdata/backups</code> to a safe location.</li>
</ul>

<h2 id="step-2-update-your-server">Step 2: Update Your Server</h2>

<p>Now that you have a backup of your data, you can proceed with updating your server. To do this, follow these steps:</p>

<ul>
  <li>Log into your Linode VM via SSH.</li>
  <li>Navigate to the directory where you installed Bitwarden. For me, it’s <code class="language-plaintext highlighter-rouge">/opt/bitwarden</code>.</li>
  <li>Run <code class="language-plaintext highlighter-rouge">./bitwarden.sh updateself</code> to update the Bitwarden script itself.</li>
  <li>Run <code class="language-plaintext highlighter-rouge">./bitwarden.sh update</code> to update all the Docker images and containers.</li>
  <li>Wait for the update process to finish.</li>
</ul>

<h2 id="step-3-enjoy-your-new-features">Step 3: Enjoy Your New Features</h2>

<p>That’s it! You’ve successfully upgraded your Bitwarden self-hosted instance on Linode. Now you can enjoy all the new features that come with the latest version of Bitwarden. Some of them are:</p>

<ul>
  <li>A redesigned web vault with improved usability and accessibility.</li>
  <li>A new Send feature that lets you securely share files and text snippets with anyone.</li>
  <li>A new Emergency Access feature that lets you grant access to your vault in case of an emergency.</li>
  <li>A new Trash feature that lets you restore deleted items from your vault.</li>
</ul>

<p>You can learn more about these features from <a href="https://bitwarden.com/blog/">the official blog</a>.</p>

<p>I hope this blog post was helpful for anyone who wants to upgrade their Bitwarden self-hosted instance on Linode. Thanks for reading!</p>]]></content><author><name>Drew Davis</name><email>myblog@davisdre.com</email></author><summary type="html"><![CDATA[How to Upgrade Your Bitwarden Self-Hosted Instance on Linode]]></summary></entry></feed>